Network Connection
🛜 Wireless Network Access
Connect your devices to Stockton University's wireless networks easily.
Follow the step-by-step instructions below to get started by choosing your preferred connection type. for Chromebooks, gaming consoles, and steaming devices - See section below
Faculty, Staff, & Students
Long term network access that provides a continuous connection for members of the
Stockton community.
-
Step 1
Select "Stockton-Secure-WiFi" from available networks
-
Step 2
Enter your GoPortal username and password when prompted
-
Step 3
️ Accept the security certificate if requested
-
Connected!
🔁 Your device will now connect automatically on campus until you change your GoPortal password!
Guests & Campus Visitors
Quick network access instructions for guests and campus visitors.
-
Step 1
Select "Stockton-WiFi" from
available networks -
Step 2
Open your web browser
-
Step 3
️ Accept the Acceptable Use Policy
-
Connected!
🕰️ You will have internet access for 12 hours.
After 12 hours you will have to follow these steps again to regain access to the Internet.
🗃️ Device-Specific Connection Guides
Need help connecting your device?
Select your device type below to view easy, step-by-step instructions with visuals.
Apple Devices

Apple Devices(iPhone, iPad, MacBook)
Apple Mobile Devices
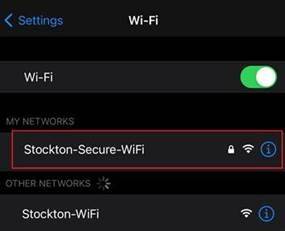
- Select Settings
- Select WiFi
- Under Choose a Network, select Stockton-Secure-WiFi
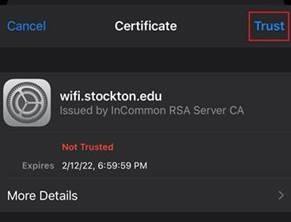
- Enter your Username and Password and select Join
- When prompted, select Trust on the wifi.stockton.edu certificate
Includes iPad, iPhone, and iPod.
Apple Laptops / Computers
- Click the Apple Logo in the top-left
- Select System Preferences
- Click Network and select WiFi from the left
- Select Stockton-Secure-WiFi from the Network list
- Enter your Username and Password and select Join
- Click Apply and close the configuration window
Includes Mac, Mac Pro, MacBook, MacBook Pro, and MacBook Air.
Windows Devices

Android Devices

Chromebooks

🧑💻 Internet Access Resources
Information on low-cost home internet programs and public WiFi locations.
Explore tools to compare internet providers, check available speeds, or find national businesses offering free WiFi nearby.
Compare High Speed Internet Providers
Highspeedinternet.com has thousands of internet providers in their database. You can find the perfect match for your area, budget, and speed needs.
Enter your zip code on their website to see every internet option in your area, or find out how much internet speed you need.
National Chains with Free WiFi
Many national chains offer complimentary WiFi to customers at no additional cost. These locations can be useful for students or individuals who need quick, reliable internet access while on the go.
You can view a list of common national chains that provide free WiFi, including coffee shops, fast food restaurants, and retail stores.
Housing Connection
Internet Access Options for On-Campus Housing
Students residing on campus can connect to Stockton's LAN for very fast Internet access. An ethernet cable and a computer with an available network jack are required. Stockton’s wireless network also supports many gaming consoles and entertainment devices. Please note: downloading copyrighted material illegally violates the Acceptable Usage Standards and federal law.
The following types of devices are not supported on Stockton WiFi networks:
- 🖨️Network Printers
- Smart Home Devices like security cameras, smart bulbs, smart plugs, roombas, etc.
- Devices that rely on Network Discovery protocols to operate, such as those needing a companion mobile app on the same network.
These are often built for consumer-grade home networks and may rely on unsupported protocols.
Gaming & Media Devices
Need to Game or Stream? Here's How to Connect
Students on campus can connect game consoles and media streaming devices using Stockton's
NetRegsystem.
You will need your device's MAC address. Below, you will find instructions for locating
the MAC address for various devices that can be registered on the network.
Playstation Consoles

Xbox Consoles

Nintendo Consoles
Amazon Alexa & Fire TV

Google Home

Roku
Apple TV