Image Sizer Utility
The Stockton Image Sizer prepares images for use in Stockton website components and snippets. It combines cropping, resizing, compression, and realistic previews in one browser-based tool.
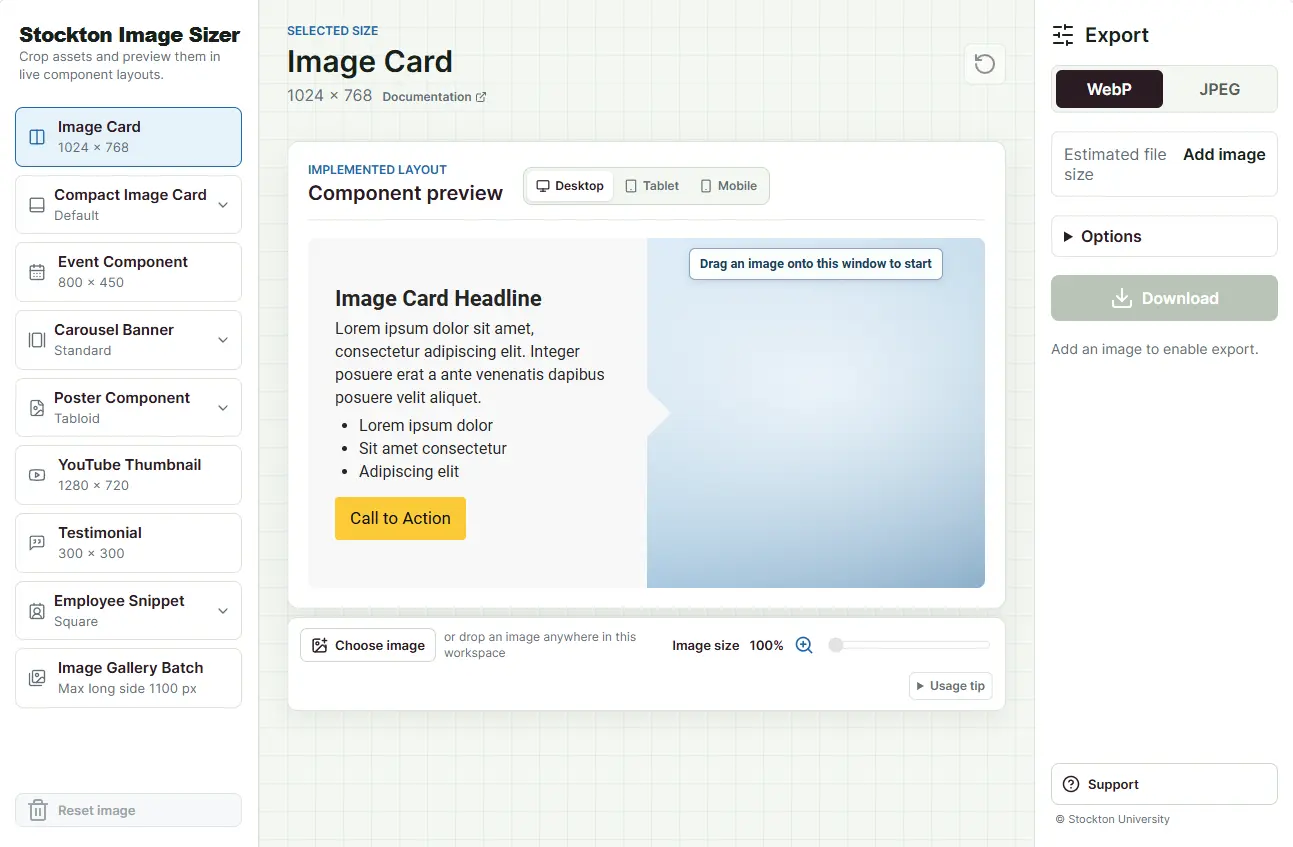
Stockton website components require specific image dimensions and aspect ratios. Preparing these images manually can lead to inconsistent crops, oversized files, and additional revisions after content is published.
The Image Sizer helps content editors:
- Select the correct dimensions for a component or snippet.
- Preview an image in a representative Stockton website layout.
- Reposition and enlarge the image directly within the preview.
- Reduce file sizes to improve page-loading performance.
How to Use the Image Sizer
- Select a component or snippet from the left side of the tool.
- Choose an image, paste one from the clipboard, or drag an image anywhere into the center workspace.
- Drag the image within the preview to adjust its position.
- Use the Image size control to enlarge the image when needed.
- Review the desktop, tablet, or mobile preview when those options are available.
- Select an export format and compression level.
- Select Download to save the finished image.
Where Your Finished Image Is Saved
When you select Download, the finished image is saved to your computer through your web browser. In most cases, it will appear in your Downloads folder.
Windows: Open File Explorer and select Downloads from the left side of the window.
Mac: Open Finder and select Downloads from the sidebar. You can also open the Downloads folder from the Dock.
If your browser is set to ask where files should be saved, or you have changed your default download location, the image will be saved to the location you selected instead.
Adding Your Image to a Page
After downloading your resized image, the next step is to add it to your webpage in Modern Campus CMS.
Using an Image in a Component or Snippet
Many Stockton components and snippets that include imagery provide an image field as part of the options. When adding or editing:
- Select the image field or browse option within the component.
- Browse to your Downloads folder on your computer.
- Upload your resized image to the appropriate images folder in Modern Campus CMS.
- Complete any required image information, including alternative text when prompted.
- Save the component and preview the page to confirm that the image displays as expected.
The Image Sizer presets are designed to match the dimensions and proportions used by Stockton components, so select the corresponding component in the Image Sizer before preparing your image.
For instructions and options specific to each component, see Using Components.
Adding an Image within a Snippet
Images can also be inserted directly into an editable region of a snippet. Place your cursor where you want the image to appear, select Insert/Edit Image from the editor toolbar, and browse for or upload your resized image.
Be sure to provide appropriate alternative text and preview the page before publishing.
For step-by-step instructions, see Adding an Image.
Supported Source Files
The tool accepts common web image formats, including:
- JPEG, JPG
- PNG
- WebP
- GIF
- AVIF
For the best results, begin with an image that is at least as large as the selected export size. The tool displays a warning when the source image may be too small.
Export Options
WebP
WebP generally creates the smallest file while retaining good visual quality. It is the default format for most image sizes.
JPEG
JPEG is broadly compatible and should be used when another Stockton system or server-side
process requires it.
Testimonial: JPEG is required.
Image Gallery Batch: JPEG is required.
Employee Snippet: JPEG is selected initially, but WebP remains available.
The downloaded file extension changes to .webp or .jpg to match the selected format.
Compression
| Option | Best Used When |
|---|---|
| Smaller file | Reducing the final file size is more important than retaining maximum image detail. |
| Balanced | You want a practical balance between image quality and file size. This is the default option. |
| Better detail | The image contains important visual detail and a somewhat larger file is acceptable. |
The tool estimates the finished file size before download. It may automatically apply
additional compression to try to keep a normal image export under 300 KB.
Advanced Options
Linking Directly to an Image Size
A support page can open the Image Sizer with a particular component or size already
selected. Add the size query parameter to the tool's URL.
https://stockton.edu/omni-cms-support/image-resizer/index.html?size=image-card
This is useful when linking to the Image Sizer from component documentation, training materials, or CMS instructions.
Available Size Values
| Image Type | URL Value | Example |
|---|---|---|
| Image Card | image-card |
?size=image-card |
| Compact Image Card — Default | compact-image-card |
?size=compact-image-card |
| Compact Image Card — Square | compact-square |
?size=compact-square |
| Compact Image Card — Wide | compact-wide |
?size=compact-wide |
| Event Component | event |
?size=event |
| Carousel Banner — Standard | carousel-banner |
?size=carousel-banner |
| Carousel Banner — Large | carousel-large |
?size=carousel-large |
| Poster Component — Tabloid | poster-component |
?size=poster-component |
| Poster Component — Letter | poster-letter |
?size=poster-letter |
| Poster Component — Square | poster-square |
?size=poster-square |
| YouTube Thumbnail | youtube |
?size=youtube |
| Testimonial | testimonial |
?size=testimonial |
| Employee Snippet — Square | employee-snippet |
?size=employee-snippet |
| Employee Snippet — Portrait | employee-portrait |
?size=employee-portrait |
| Image Gallery Batch | gallery-batch |
?size=gallery-batch |
Additional URL Information
- An invalid or missing value opens the default Image Card option.
- The URL controls the initially selected size only. Selecting another size inside the tool does not rewrite the URL.
- Export and filename settings cannot currently be controlled through URL parameters.
Advanced Filename Options
Advanced filename controls are available under Options. These preferences are remembered in the browser used to access the tool.
Optimize Filename
This option creates a web-friendly filename by:
- Converting letters to lowercase.
- Replacing spaces with hyphens.
- Removing or replacing special characters.
- Removing unnecessary hyphens at the beginning or end.
Original filename:
Campus Event Photo (Final).JPG
Optimized filename:
campus-event-photo-final.jpg
Avoid Duplicate Names
This option adds a short component code and random identifier to the beginning of the filename. It helps prevent a new CMS asset from having the same filename as an existing asset.
ec-k4p2-campus-event-photo.jpg
Filename Prefix
A prefix adds your own text before the original filename. Entering a manual prefix takes the place of the automatically generated duplicate-name prefix.
Prefix:admissions
admissions-campus-event-photo.jpg
Filename Suffix
A suffix adds your own text after the original filename.
Suffix:homepage
campus-event-photo-homepage.jpg
Keeping the Original Filename
To retain the original base filename:
- Turn off Optimize filename.
- Turn off Avoid duplicate names.
- Leave the prefix and suffix fields blank.
The app will preserve the original name, capitalization, spaces, and punctuation. Only the extension changes if a different export format is selected. Image dimensions are not added to filenames.