Microsoft 365 Tips

Mail Merge allows you to create individualized documents based on information contained in two different files. You’ll need the main document (e.g. a letter), and a data source (e.g. list of addresses) from Excel or Outlook Contacts. Then follow the instructions linked here to produce a merged document with these files using Mail Merge.
Outlook 365 - Sending Large Attachments
File sizes have grown over the years; however, not all e-mail service providers have kept up with attachment limits. Sending a file larger than your recipient's file size limit may prevent your message from reaching their inbox. Before sending out an e-mail with a large attachment (> 5 MB), consider using the OneDrive online storage provided with your Office 365 membership to share files as a link.
Attaching your File
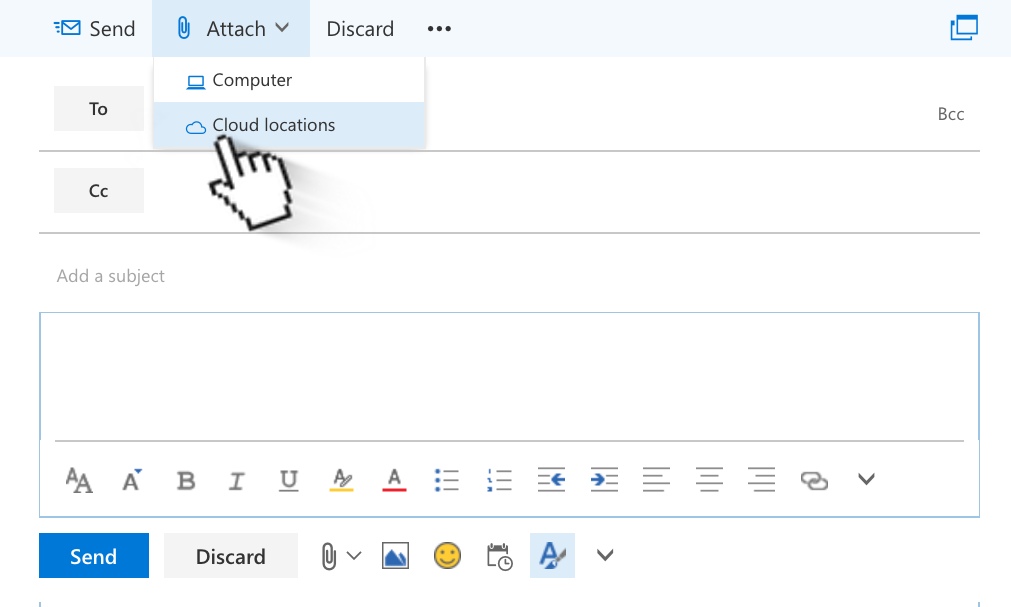
Once you have your message and file ready, find the "Attach" menu and choose the "Cloud Locations" option.
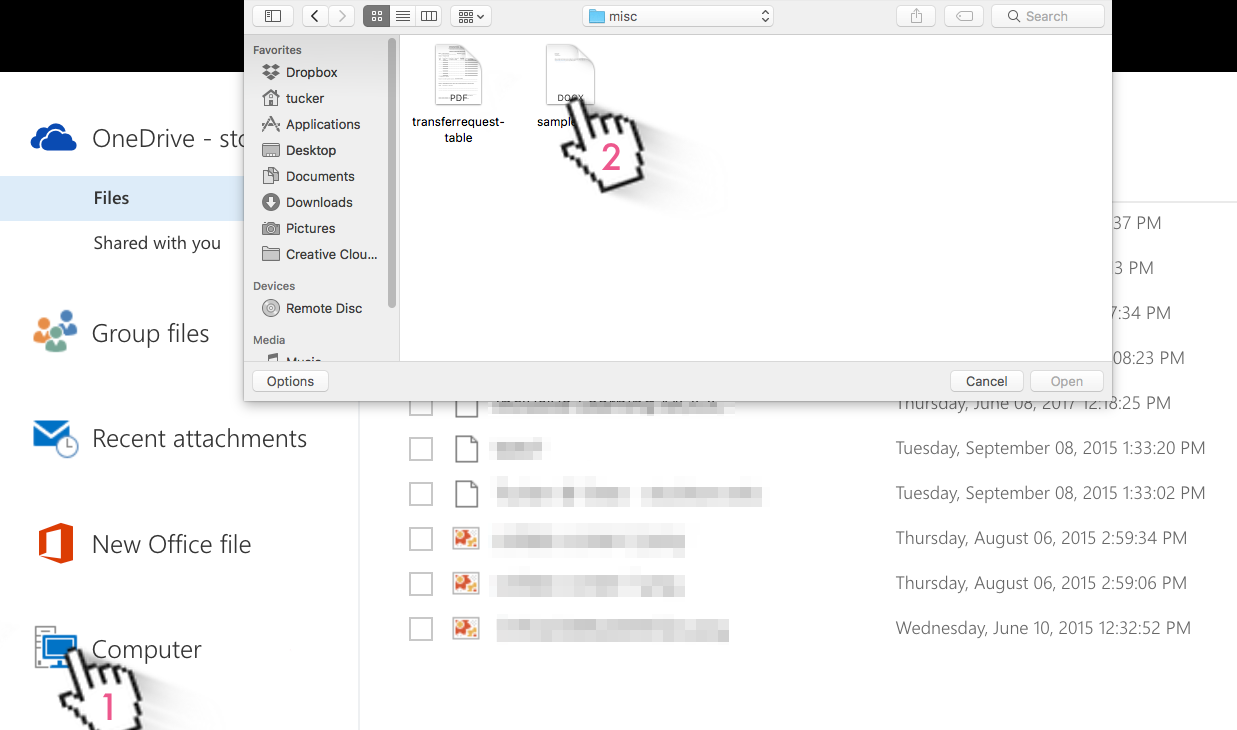
Next, choose the option "Computer" to instruct the OneDrive tool to look at local files, then browse for and select your file.
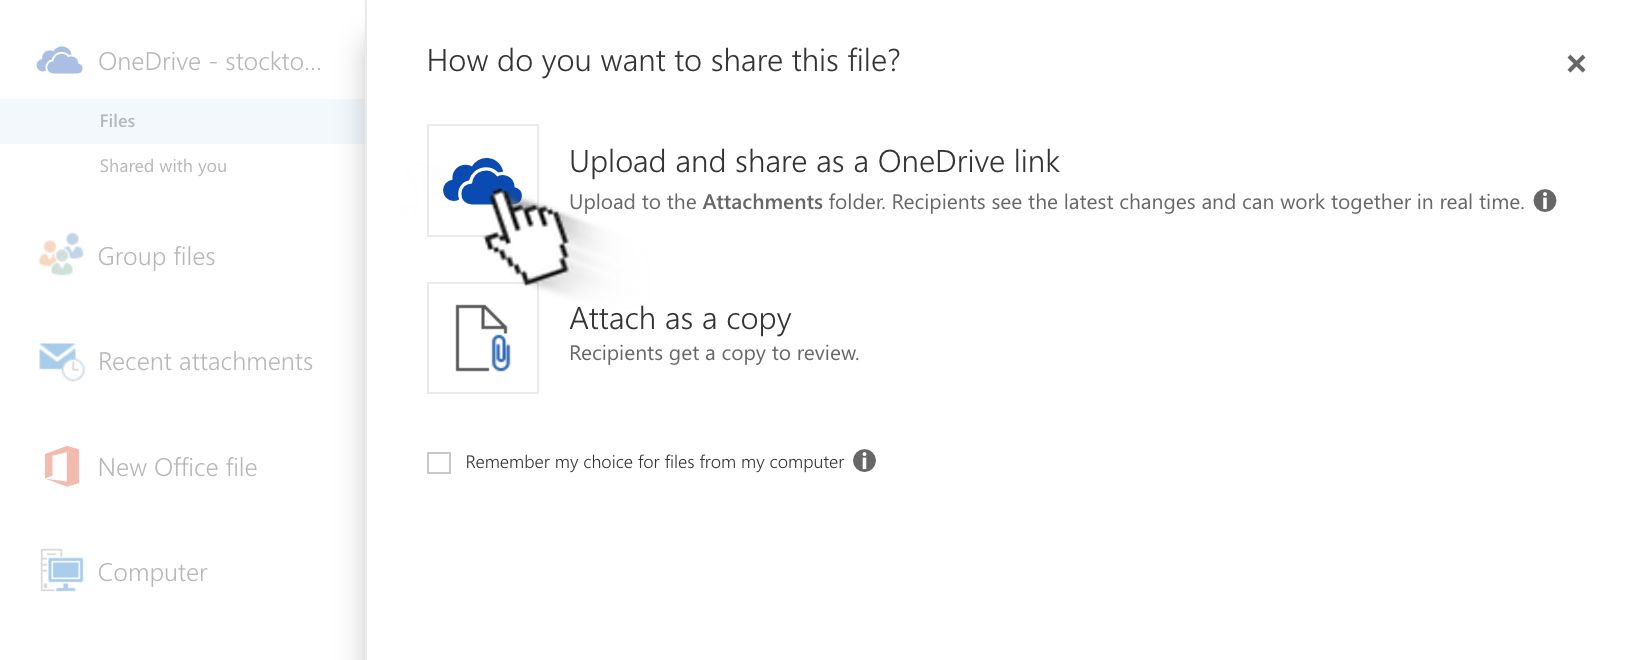
You'll be prompted to choose how to attach your local file. Confirm that you wish for the file to be uploaded to OneDrive and attached as a link.
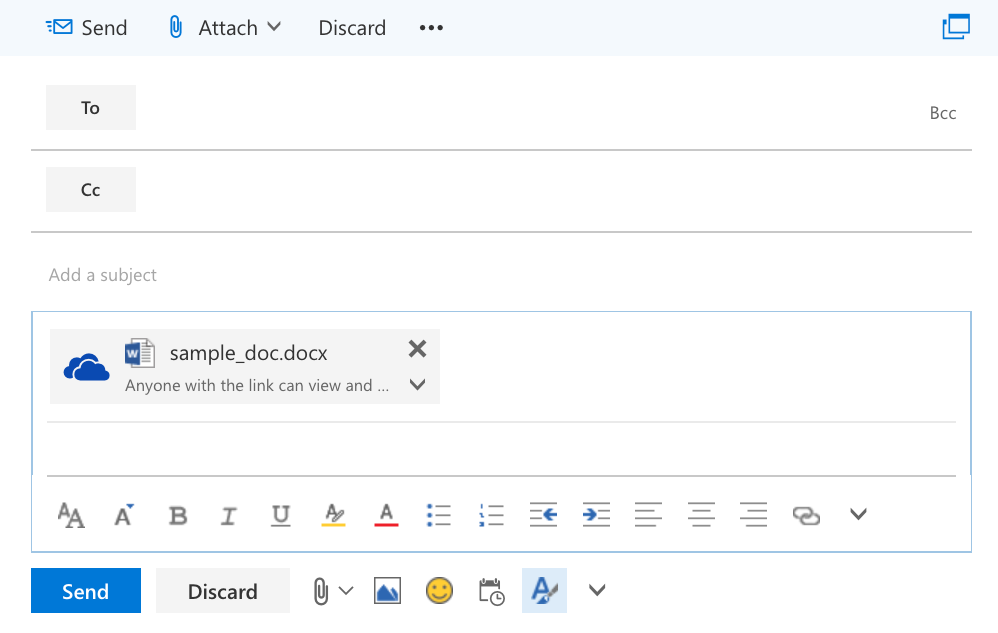
Once your file has finished uploading, you'll see it attached as a OneDrive link. Your recipient will be able to download the file as long as it exists within your OneDrive storage.
For more information on Microsoft OneDrive and using it to store, share, and collaborate on your files, check out the Learning OneDrive course on Lynda.com!
Backing up data is an important part of managing your digital content, and here at Stockton all files saved to your My Documents folder are automatically backed up to Stockton’s servers. This protects your work from accidental deletion, corruption, or hardware failure, and gives you access to it from any Stockton computer that you’re currently logged in to.
In this example of how to save your work to your Stockton network backup folder, we’ll be using any component program of the Microsoft Office Suite.
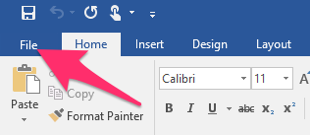
With your document open, click on the File tab.
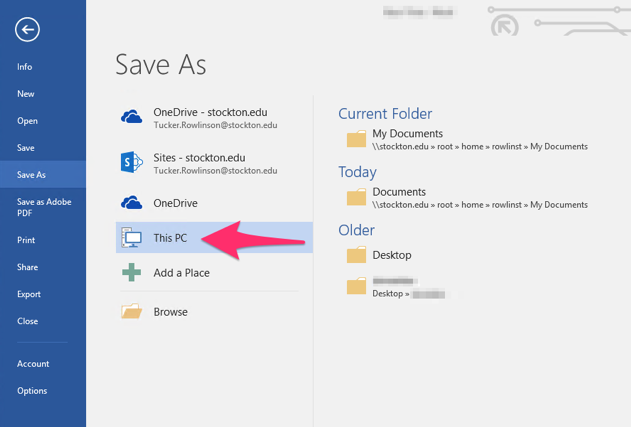
Next, choose the menu entry “Save As”, followed by “Browse”. This option will allow you to navigate to and choose your “My Documents” backup folder as the storage location for your document.
Keeping your documents backed up is critical to data security, and lost work is lost time! Nobody wants to re-write a syllabus from scratch, or to lose batches of data collected in the field. Additionally, if you’re ever off-campus and need a document, you can access this folder by logging into Stockton’s VDI, a virtual desktop service that operates on Stockton’s network.
For tips on moving your existing files over to the local backup folder, check out this handy video course on Lynda.com!
Reply All is the default option when replying to messages in Outlook on the Web for Office 365. You can select Reply by clicking on the down arrow to the right of Reply all, but when responding to an e-mail, Reply all is the default option.
![]()
To change the default option on your account to Reply rather than Reply all, follow the instructions below:
- Go to Outlook on the web from the Stockton Portal or at https://outlook.office365.com and sign in
- On the top right, click or tap on Settings
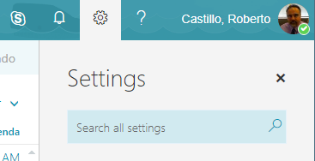
- Under Your app settings, select Mail
- To the left, under Options, Mail, Automatic processing, click or tap on Reply settings
- Select Reply under Make my default response
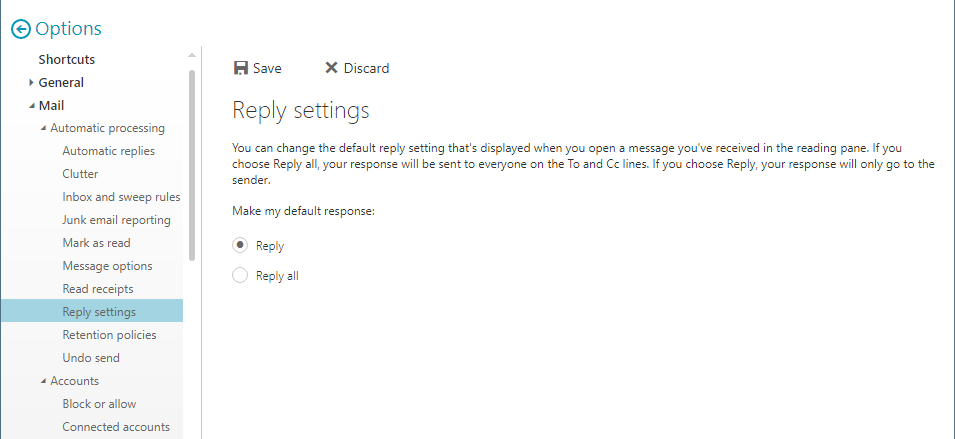
- Click or tap on Save
The response button will now change to Reply
Groups are the new and improved option in Microsoft 365 for sending e-mails to multiple people. They replace Contact Groups (formerly known as Distribution Lists) and also include powerful collaboration features.
Use Groups in Office 365 to collaborate with and easily set up a collection of resources with Stockton users to share. Adding members to the group automatically gives them the permissions they need to the tools your group provides.
The instructions below will show you how to create Groups in Outlook.
- Open Outlook 2016.
- Do one of the following to start a new Group:
- Outlook 2016 Client. Select Home > New Group.

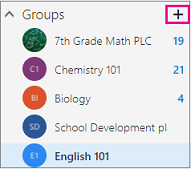
- Outlook on the Web. In the navigation pane (left), below your Folders, next to Groups, select the + button. (If you have a long folder list, you'll need to scroll down until you see Groups.)
- Outlook 2016 Client. Select Home > New Group.
- Fill out the group information.
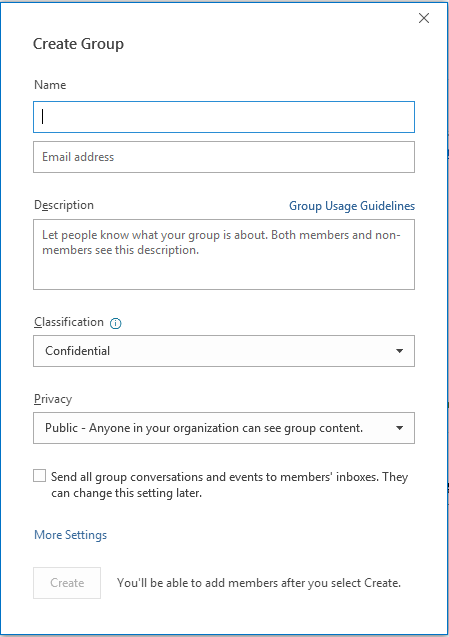
- Group name: Create a name that captures the spirit of the group.
- Once you enter a name, a suggested email address is provided. "Not available" means the group name is already in use and you should try a different name. Note that once you choose a group name, it cannot be changed.
- Description: Optionally, enter a description that will help others understand the group's purpose. This description will be included in the welcome email when others join the group.
- Classification: Choose a classification. Options available depend on what your organization has set up.
- Privacy: By default, Groups are created as Private. This means only approved members in your
organization can see what's inside the group. Anyone else in your organization who
is not approved cannot see what's in the group.
- Select Public to create a group where anyone within your organization can view its content and become a member.
- Select Private to create a group where membership requires approval and only members can view group content.
- Send all group conversations and events to members' inboxes Optionally, check this box to enable members to see all group conversations and events in their inbox without having to visit separate group workspaces. Members can change this setting for their own mailboxes.
- Select Create.
You can now use your Group in an e-mail just like a distribution list
Add Members to your Groups
- Your Groups are accessible from your Folder List. Just scroll down to Groups and click on the arrow to expand it.
- Select your Group
- On the Groups ribbon, select Add Members

- In the Add Members dialog box, under Add people, search for the new member and click on his/her name to add the account to the Members list
- Click on OK when finished
Remove Members from your Groups
- Your Groups are accessible from your Folder List. Just scroll down to Groups and click on the arrow to expand it.
- Select your Group
- On the Groups ribbon, select Add Members
- Under Members, point at the person's name and click on the X to the right
- Click on OK when finished
Let Flash Fill help you enter data faster and more accurate. It predicts the rest of the data based on the first entry posted. Below are different ways you can take advantage of this feature in Excel.
Separate First and Last Name
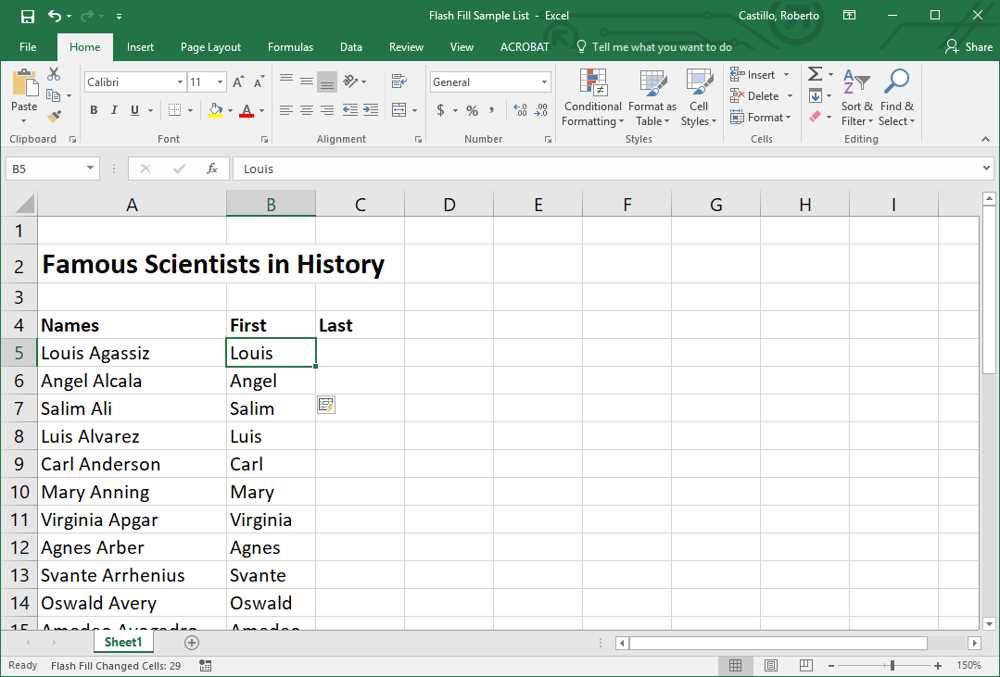
If you have a list of names in one column, Flash Fill allows you to quickly separate the names in different columns. In the example below, I want first and last name to be in their own columns.
- Create first and last columns to the right of Names (See picture below)
- Enter the first names. As soon as you start typing the second "First" name, Flash Fill will preview a list, predicting how you want to fill the column
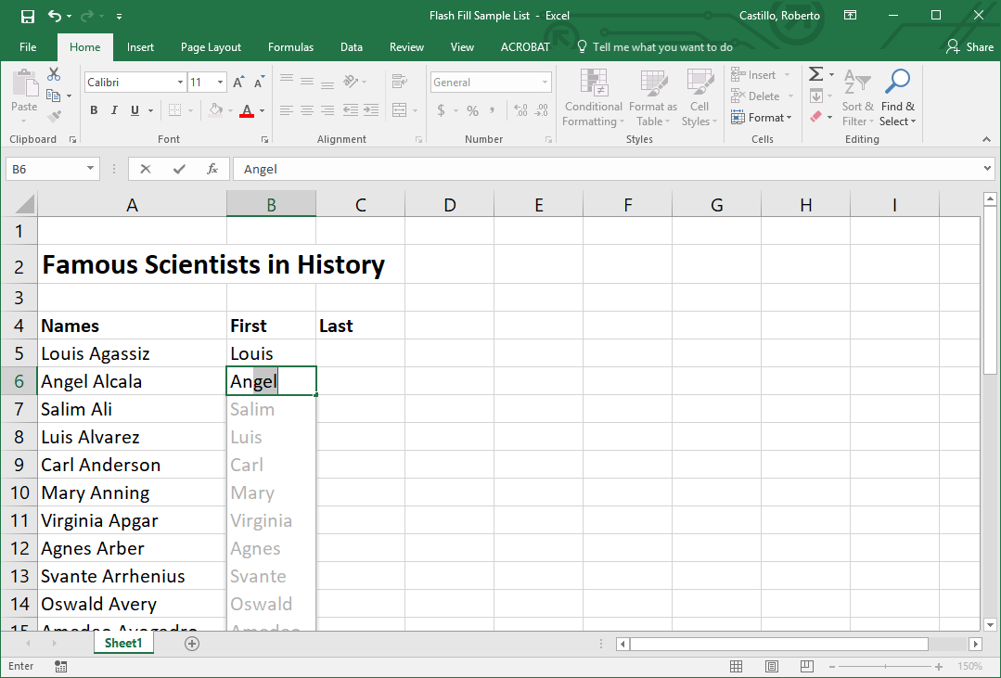
- Just hit the Enter key to complete the rest of the column
Fill a Formula to Adjacent Cells
Flash Fill can also copy formulas by dragging the Fill Handle (bottom right)
- Enter the formula and hit Enter
- Click on the formula to select the cell
- Point at the Fill Handle (bottom right) until the pointer changes to a black plus sign
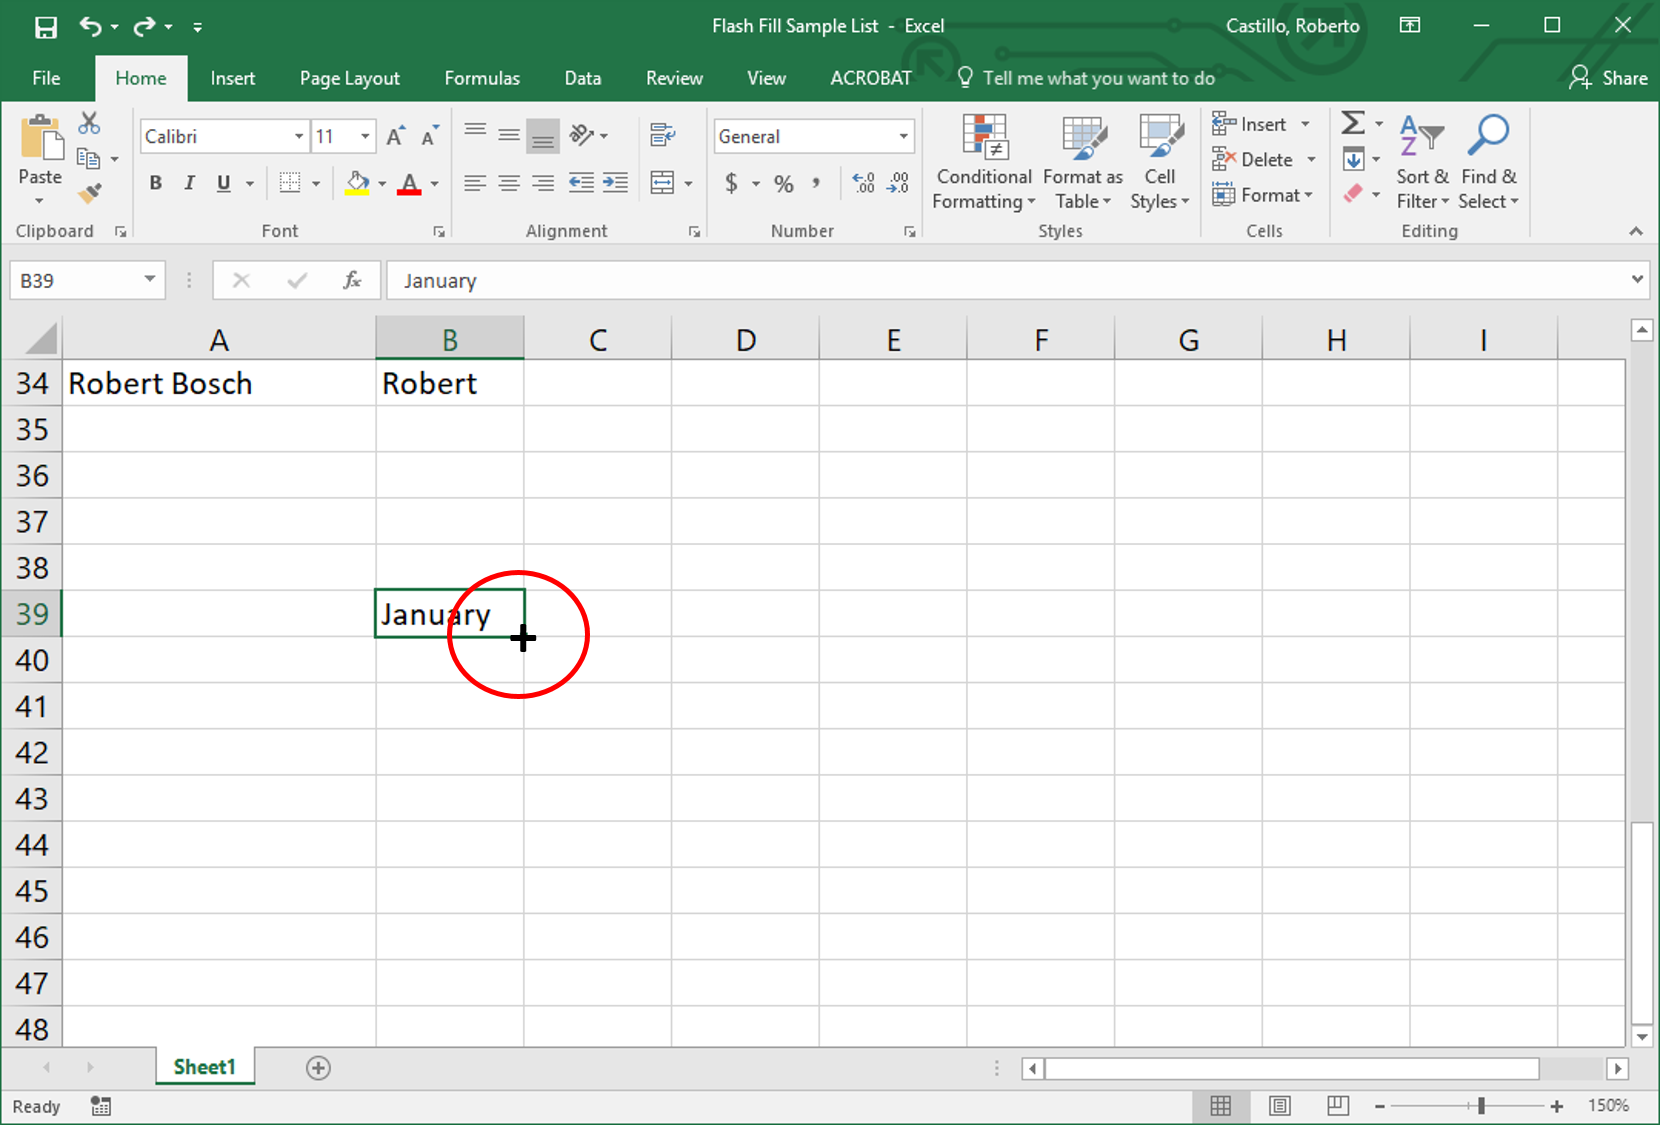
- Click & hold and drag the Fill Handle across the cells you want to fill
Quickly Enter Months of the Year or Days of the Week
- Enter the month or day
- Click on the month or day
- Click & hold on the Fill Handle
- Drag the Fill Handle across the cells you want to fill
Distribution lists make it easy to reach out to many organization members at once. Membership, however, is not an automatic process and must be managed manually.
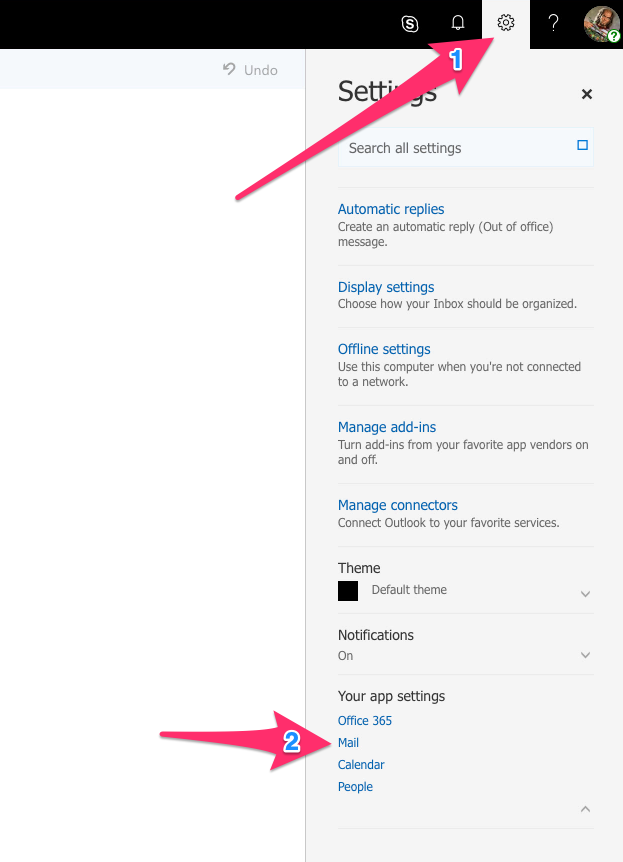
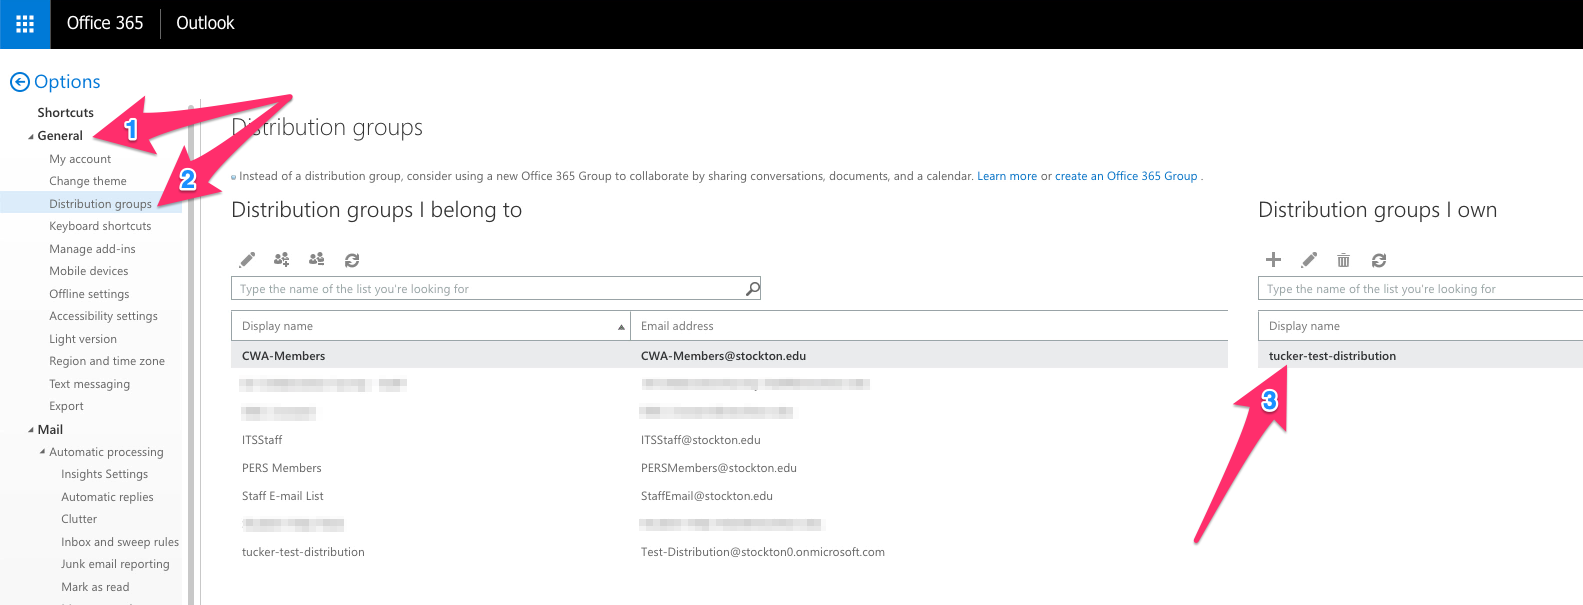
To begin, open up your web browser and access Outlook Web. Find and click on the Settings (Gear-shaped) icon. Then, click on the entry “Mail”.
Next, in the left-hand menu, click on “General” and then “Distribution Lists”. Under
“Distribution Lists I Own” double-click on the name of the group you’d like to make
changes to.
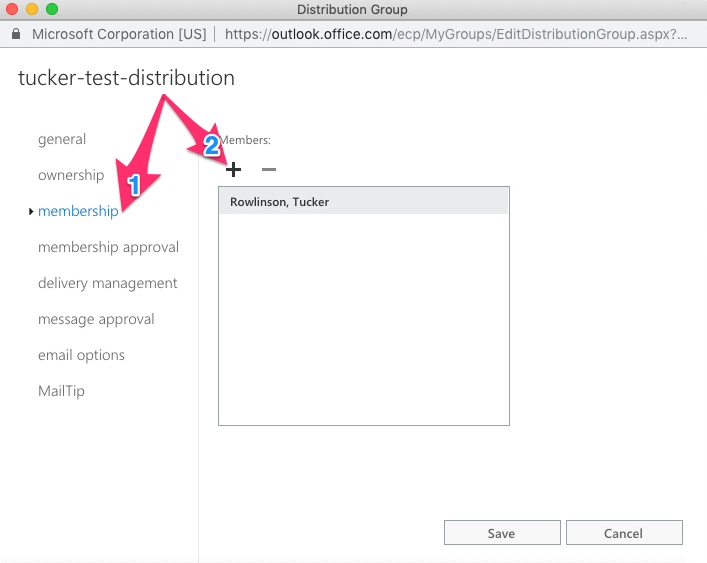
You’ll be brought to the details pane of the group, click on “Membership” to manage
the users included on the distribution list. Click on the plus (+) icon to add members
or click on member names followed by the minus (-) icon to remove members.
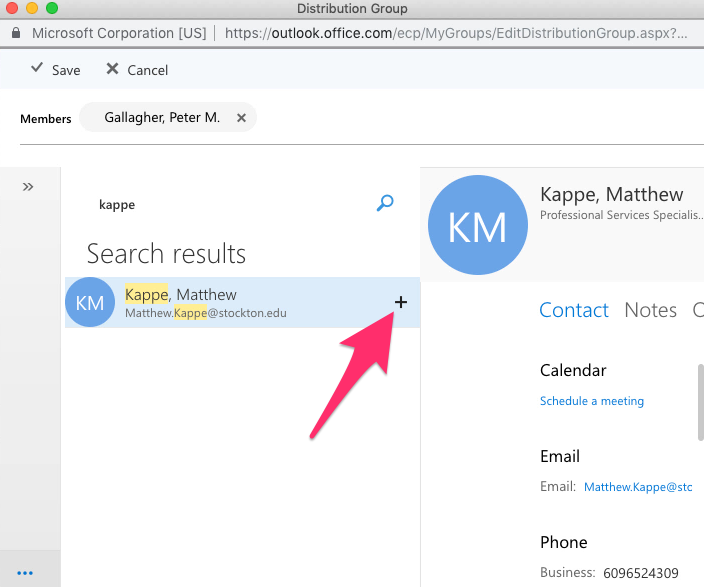
When you click on the plus (+) icon to add members, you’ll be brought to a search
page. Enter a last name and click on the magnifying glass to search for a user. Click
the plus (+) icon to the right of a person’s name to add them to the list of users
to be enrolled in the distribution list. Click Save ✔️ in the top-left of the search
window when you’ve finished choosing new members.
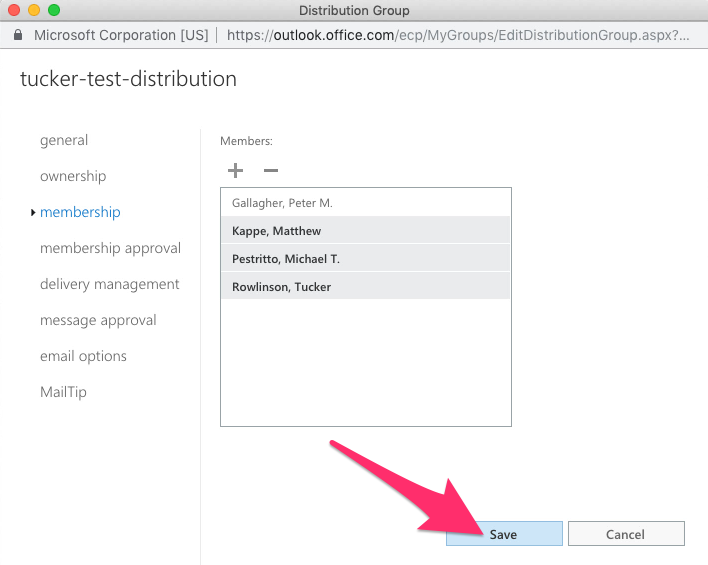
Click Save to finalize changes made to the group’s membership.
Microsoft Teams is a versatile messaging platform designed to connect users and facilitate the quick exchange of ideas and content. Comparable services include Slack and Google Hangouts. Try using Teams to communicate with your colleagues, it’s included in your Stockton Office 365 subscription!
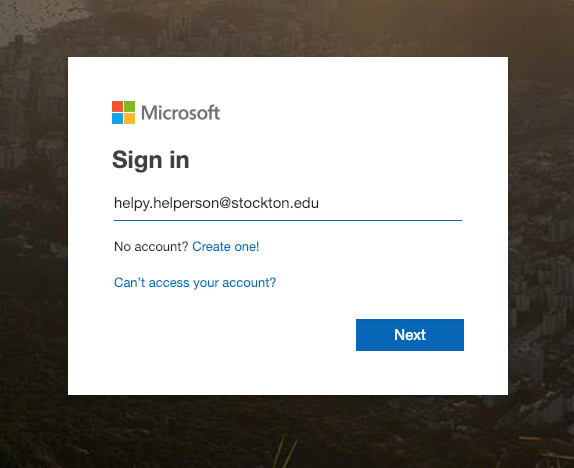
To begin, open up your web browser and navigate to teams.microsoft.com. Log in using your Stockton.edu e-mail address.
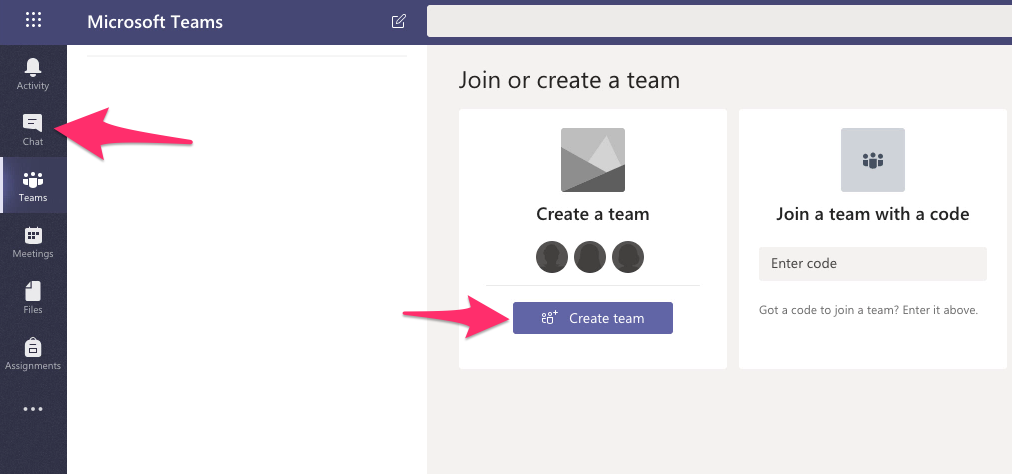
You’ll be brought to the main Teams window. From here, you can create Teams, which function similarly to a group chat, or go to the Chats pane, which allows you to message users individually.
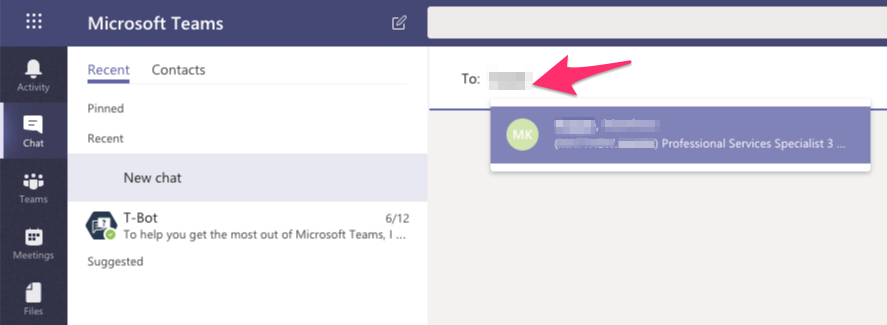
In the Chats pane, you can search for individual users by first name, last name, or e-mail address.
Teams is great for sharing content; when you’re composing a message, click on the “Attach” icon to send any type of file, whether it’s to one person or a Team chat!

Microsoft Teams is also available for your smartphone! Get it on Google Play or in the App Store.
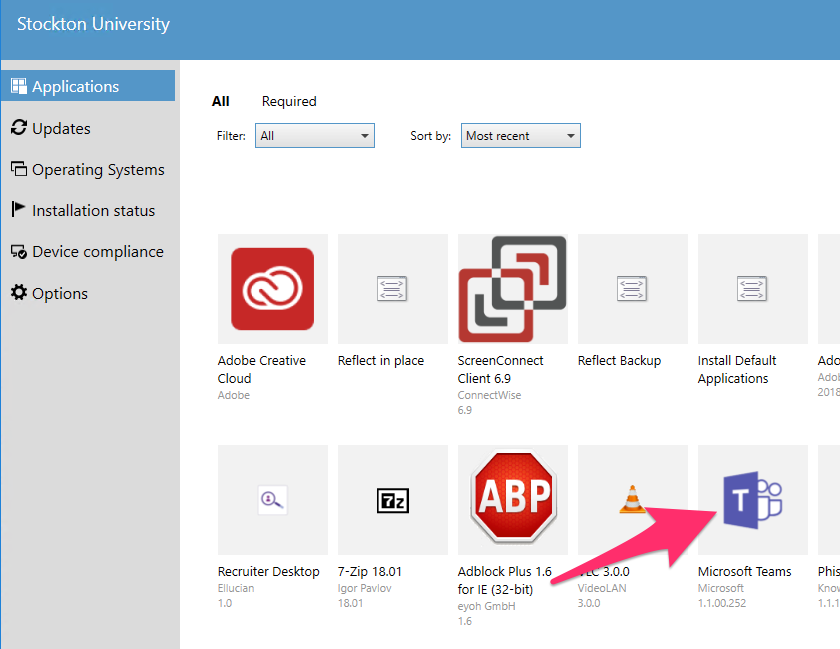
To download the Microsoft Teams client on your Stockton desktop or laptop, open the Software Center and click on the Teams icon.
For additional Information on maximizing your Microsoft Teams experience, check out this Teams short course on Lynda.com.
If you expect to have limited e-mail access, it’s a good idea to set an Out of Office message to alert students and coworkers who may be attempting to reach you. In the Outlook Web interface, this can be enabled indefinitely or set to operate only until a specific date and time.
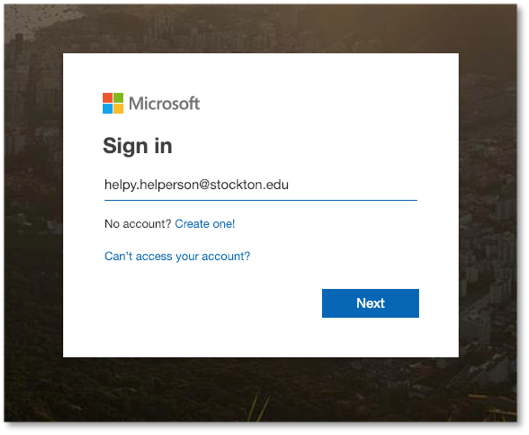
To begin, open up your web browser and navigate to go.stockton.edu, next, log in with your GoStockton credentials and click on the e-mail icon at the top-right corner of the GoPortal. Sign into your e-mail with your full firstname.lastname@stockton.edu address.
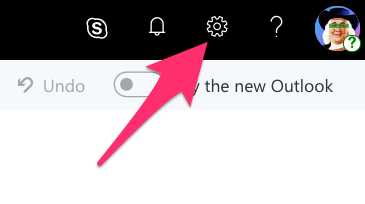
You’ll be brought to the main Outlook window. From here, click on the Settings icon.
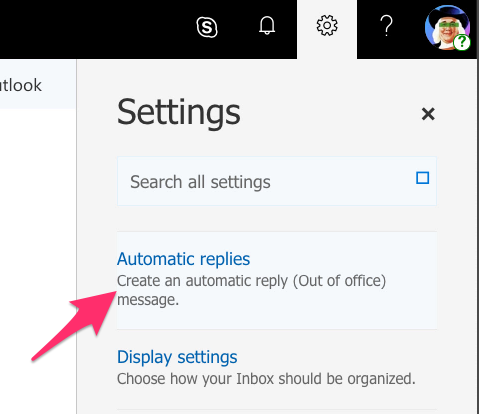
Choose the option “Automatic Replies”.
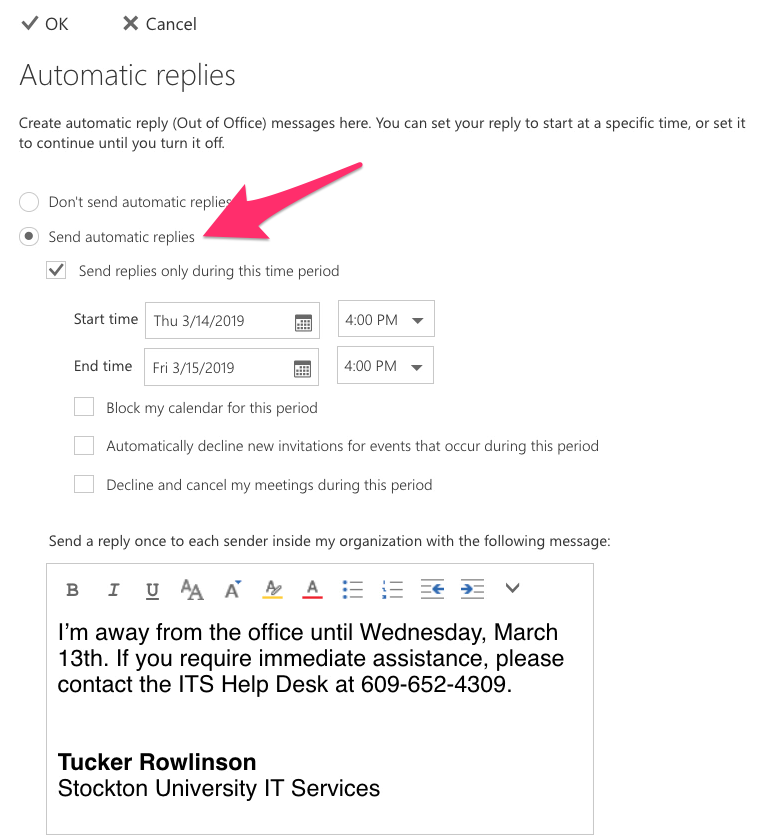
In this menu, you can turn on Automatic Replies, designate start and end times for the replies, and compose Automatic Replies for Stockton and (optionally) non-Stockton e-mail addresses.
For additional information on Outlook on the web, check out Lynda.com’s Outlook on the web Essential Training course.
To mitigate the effects of a bug which exists in the interactions between iOS’s calendar and Events created in Outlook, IT Services recommends that you install and use the official Outlook app to use with your Stockton e-mail address. Additionally, the Outlook app offers several features not available in the default Mail client such as Focused Inbox and the ability to view shared calendars.
To begin either follow this link on your phone, or open up the App Store on your iOS device and search for “Microsoft Outlook”.
Open up your newly-downloaded Outlook app and log in with your full “firstname.lastname@stockton.edu” e-mail address.
If you’d like to compare the experience of Focused Inbox, you can toggle it on and off in the Settings menu. To access the Settings menu, tap at the menu icon in the top-left of the screen and navigate to Settings – denoted by a gear icon. Once in the settings menu, you can access features such as Signature customization and how swipe actions function.
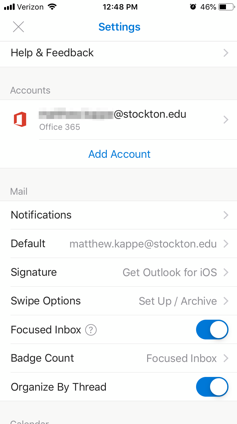
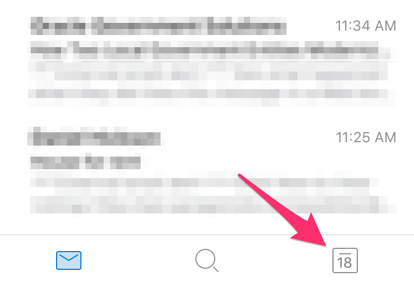
To access your Calendar, leave the Settings menu and tap on the Calendar icon at the bottom of the screen.
While in the Calendar view, you may add shared calendars by tapping on the menu icon in the top-left of the screen, then on the option “Add Shared Calendar”. Enter the shared account e-mail address you’d like to add and click on the + icon.
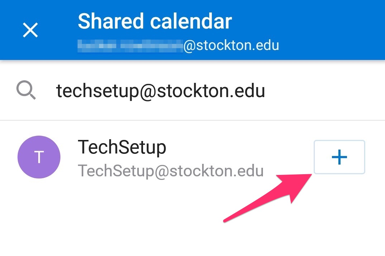
So long as your account is authorized to access that shared calendar, events from that calendar will now be visible in your Outlook app.
Phishing is any attempt to disguise electronic communications with the intent to defraud
and acquire information such as usernames, passwords, or credit card details. As computer
networks become hardened against online attacks, social engineering has become a more
potent vector and an attractive target for criminals. Stockton University takes network
security seriously and asks that you notify staff of any phishing attempts you receive.
If you have received a message directing you to reply with or otherwise enter personally identifiable information online, please report the message as a phishing attempt (phishing@stockton.edu) or use the phish alert button which reports the phishing solicitation to the Information Security team (this button automatically appears in your Outlook and Office 365 clients).
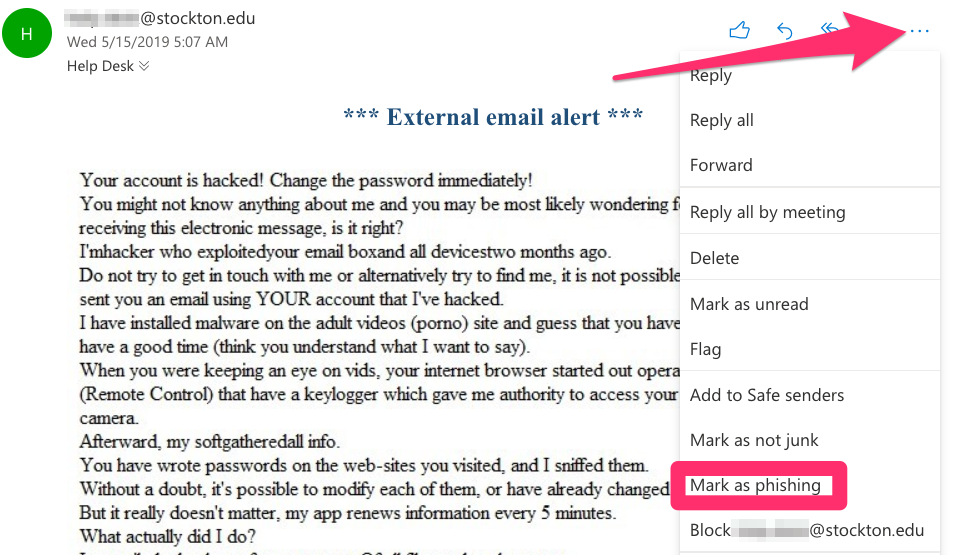
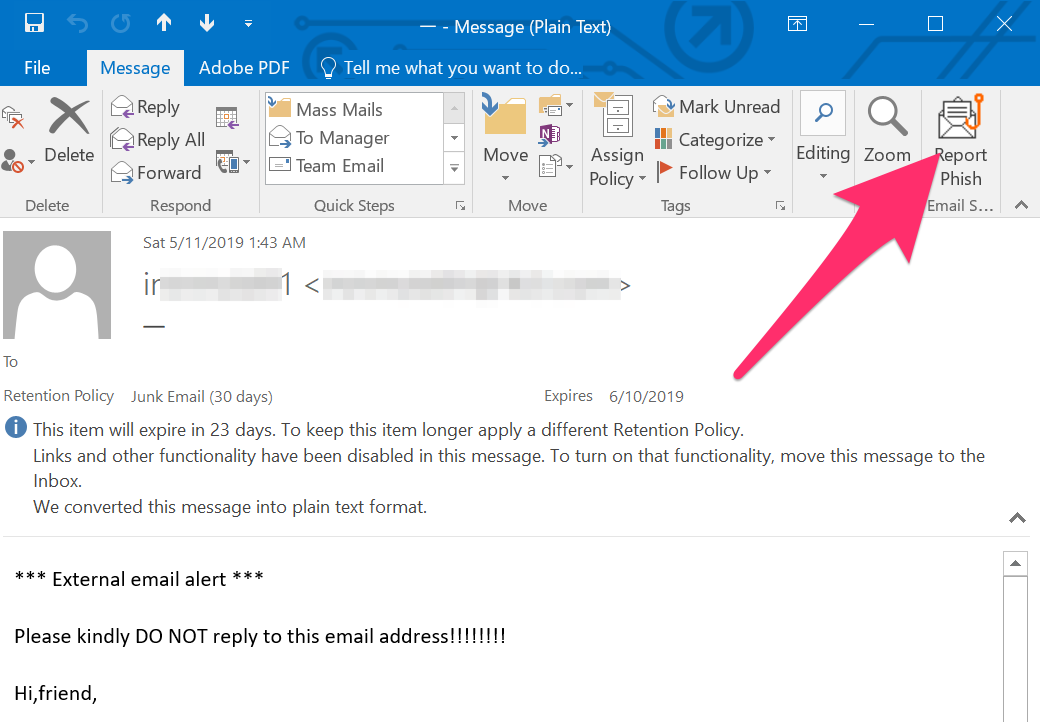
The Phish Alert button will also delete the suspicious email from your mailbox to
prevent any future exposure. We all play a critical role in keeping institutional
data secure and to aid in this task, we ask that you take a skeptical approach to
any solicitations that seem suspicious. Stockton University's Information Technology
Services will never ask you to disclose your password (via email or otherwise).
If you suspect that you’re being targeted, please notify information.security@stockton.edu via email or by calling (609) 652-4779.
Additionally, if you feel unsure about an email message sent from a member within the Stockton community, please reach out to them or their unit directly for clarification (before clicking on included links or opening suspicious attachments).
You can now record your computer screen and audio with Screen Recording in PowerPoint for Office 365, 2016. You have the option of adding the recorded video to a PowerPoint presentation or you can save it as a separate file to create a screencast.
Record from your computer screen and embed the recording in PowerPoint
- Start PowerPoint.
- Open the slide where you want to add the screen recording on.
- On the Insert tab, click/tap on Screen Recording.

- A pop up menu will open (the Control Dock) Tap/click Select Area.

- Point the cross-haired cursor at the top left of the area you want to record, then click and drag to select the area.
- By defaul, the Audio and the Record Pointer are selected on the Control Dock for recording. You can turn them off by just clicking on those options.
- When Ready, click Record. (Unless you pin the Control Dock to the screen, it will slide up into the margin while you record. To make the unpinned Control Dock reappear, point the mouse cursor at the top edge of the screen.)
- As you record the screen, you can do the following:
- Click Pause to temporarily stop the recording (Windows logo key+Shift+R):
- Click Record to resume recording (Windows logo key+Shift+R).
- Click Stop to end your recording (Windows logo key+Shift+Q).

- When you are finished recording, save your presentation: File > Save. The recording will be embedded on the slide on your PowerPoint presentation.
To save the recording itself as a separate file on your computer, right-click on the recording, and select Save Media As. In the Save Media As dialog box, specify a file name and folder location, then click Save.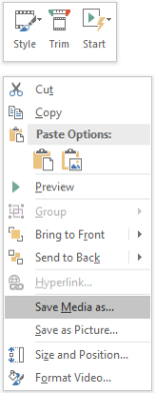
Set your video Start settings
In your PowerPoint presentation, right-click the video frame, click Start, and pick how you want your video to start in your presentation
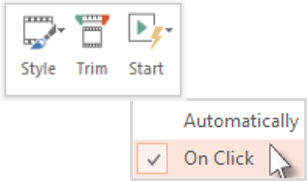
Trim your video
- Right-click the video frame, and click Trim.
- Slide the Markers or use Start Time, End Time to cut out portions of the video at the begining and the end of the clip
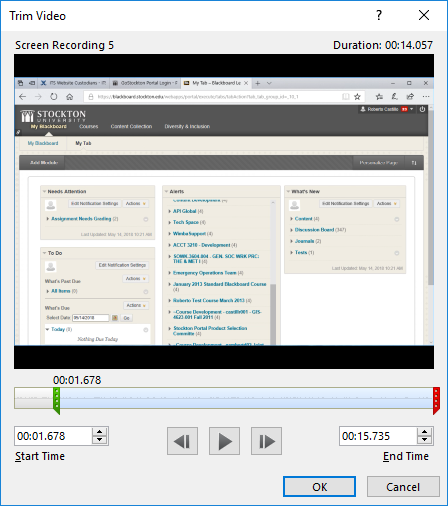
- When done, tap/click on OK
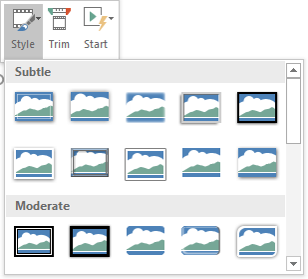
Apply a style to the video frame
In your PowerPoint presentation, right-click on the video, click Style in the Control Dock menu, and pick a style.
E-mail is one of the most reliable forms of communication at Stockton University. All faculty, staff, and students are provided with an e-mail address, and it produces a record for both the sender and the recipient. Often it can be burdensome to address e-mails to many recipients, however with e-mail lists you can reach your entire class with a single message!
To begin, either open your Outlook desktop client or mobile app, or log into Outlook Web in your web browser. Class e-mail lists are only available to @stockton.edu e-mail address associated with a course’s instructor, they will not relay your message if it originates from a personal e-mail address e.g. gmail, yahoo mail, aol.
When using your class e-mail list, the address is formatted as:
[semester][year]-[school][course][section]@stockton.edu
For example, a 2019 Fall Semester course, GEN-1000-091, would be addressed as
“ fall2019-gen1000091@stockton.edu ”.
Any messages sent to these lists will be relayed to all students currently registered for the course in Banner, this does not include waitlisted students. These lists are automatically generated and will self-update as students register and de-register.
Keeping track of tasks can be a job of its own when working across platforms. Microsoft To Do integrates with Outlook and other Microsoft Office suite products and can help centralize your list of To-Do’s!
Our first step is to sign in, you’ll need to log in at to-do.office.com with your Stockton e-mail address and GoPortal credentials.

Once you’re logged in, you can begin creating Tasks. Click on the “ + Add Task ” button to make your first task.

Once a task has been created, you can make changes to individual Task settings by clicking on the task and working in the right-hand side Task Properties menu.
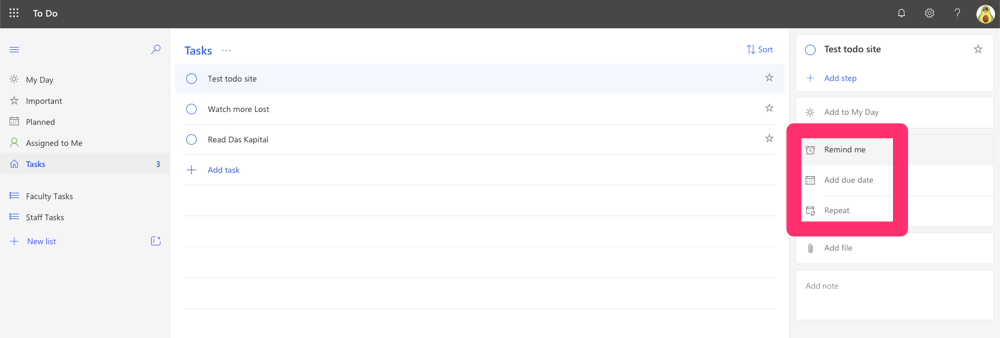
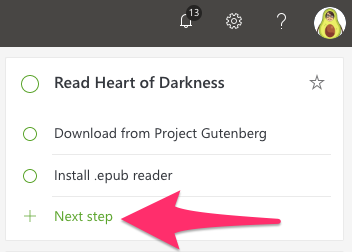
Additionally, a task can be assigned “Steps” or discrete sub-tasks. Each step can be marked as complete individually.
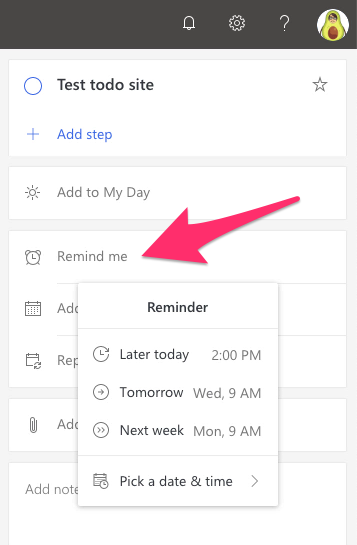
Tasks can also have reminders and due dates set, each can use predetermined dates or have custom dates and times entered.
A key feature to To Do is its ability to share data across Microsoft products – for example, Tasks can be created, viewed, and modified in their own Tasks tab in Microsoft Outlook.
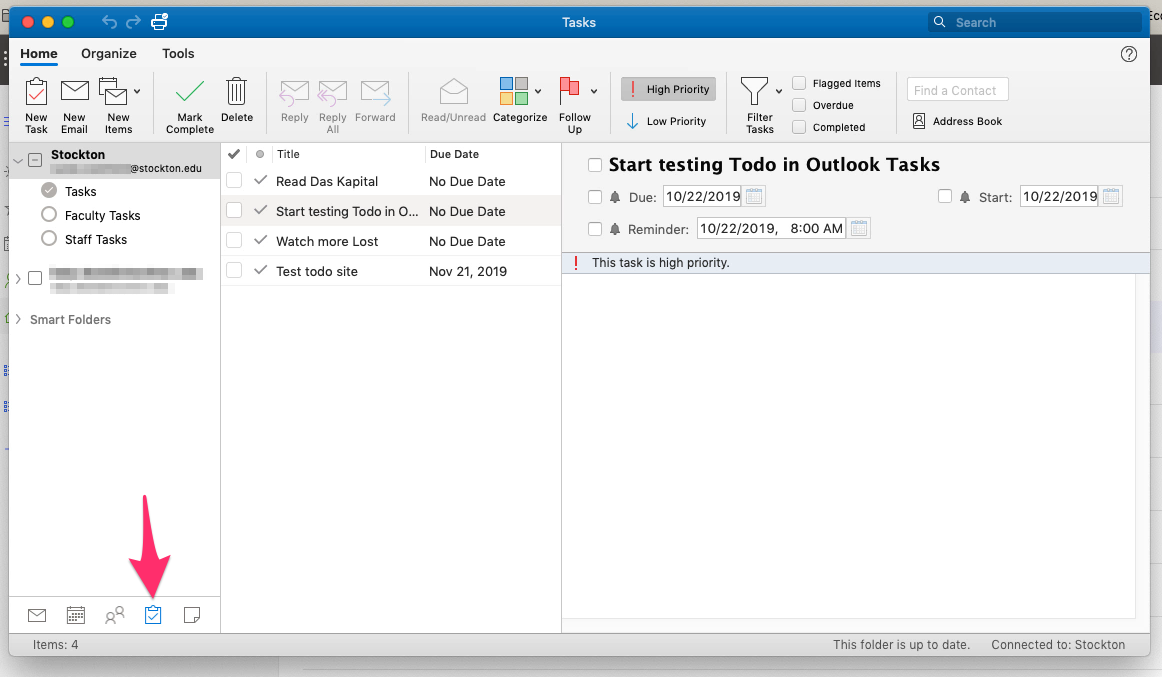
A task list is fundamentally a basic concept, but To Do’s power lies in its integration across other tools. For more information on how to leverage To Do and make task tracking easier for you, check out Microsoft’s To Do support catalog.
Adding or updating your profile photo is a fun way to personalize your @stockton.edu e-mail address. When setting up your profile picture, please be sure to use a work-safe and friendly image!
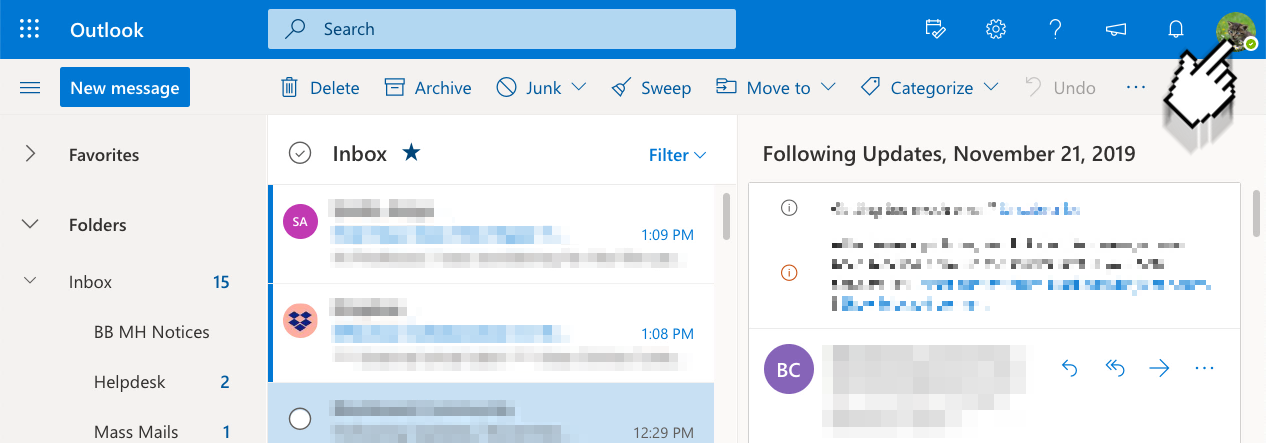
Our first step is to sign in: you’ll need to log in at outlook.office.com with your Stockton e-mail address and GoPortal credentials.
Next, locate your user icon at the top-right corner of the screen. If you have not set a profile picture before, it will appear as your first and last initials. Click on the user icon, and you’ll be brought to the “My account” menu.
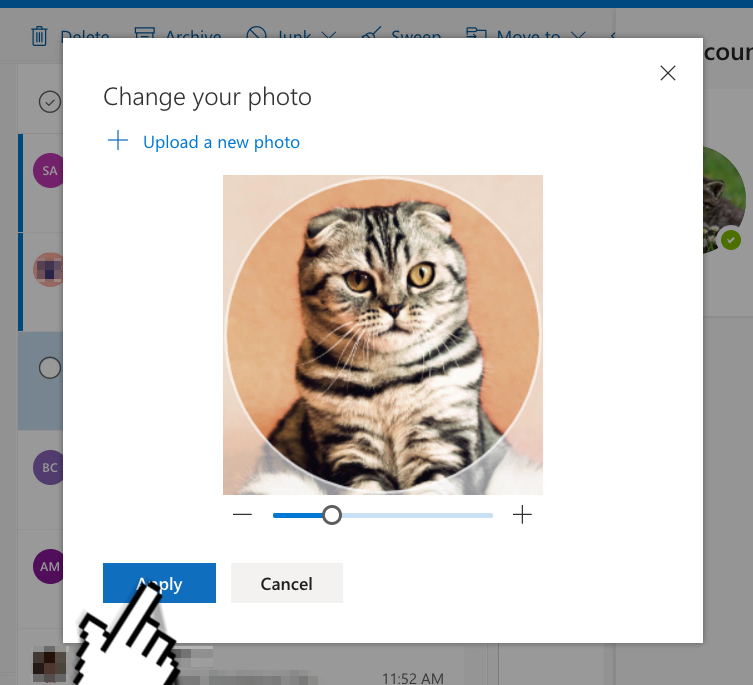
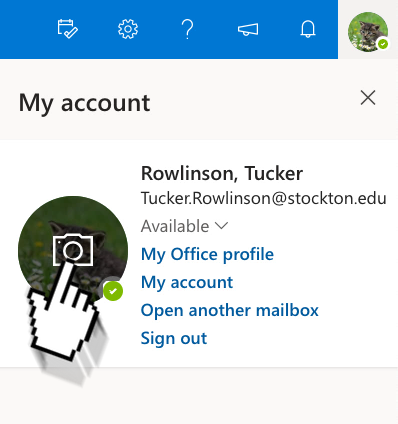
In the “My account” menu, hover over the expanded user icon and you’ll see the outline of a camera appear. Click on that camera and you’ll be brought to the “Change your photo” dialog box.
Click on “+ Upload a new photo” to choose an image file from your computer.
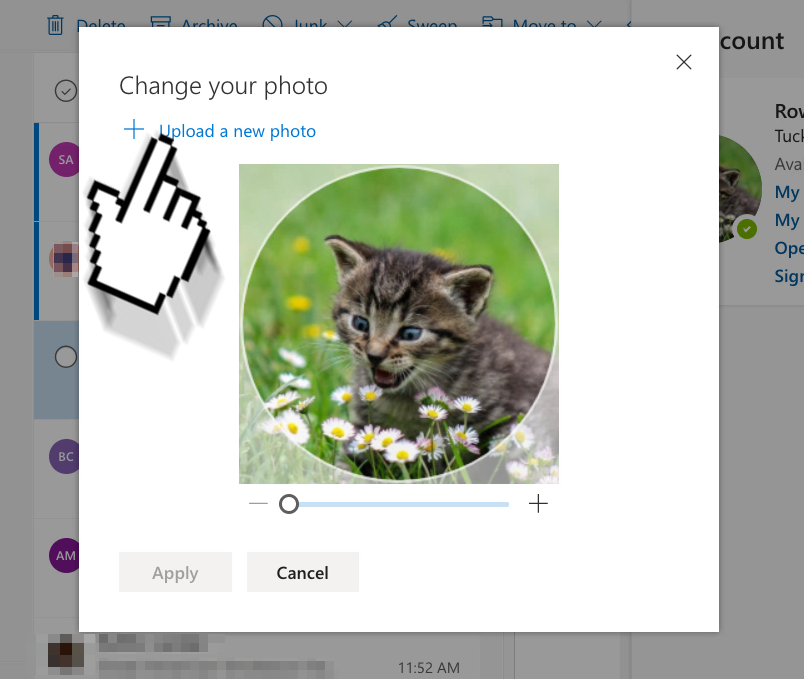
Once you’ve uploaded your photo, you can use the zoom slider below your new profile
picture to adjust its size. Additionally, once zoomed in you can click and drag to
reposition the picture within its circle of visibility. Click “Apply” and then “Done”
to finalize your changes, and your new profile picture will begin to appear alongside
your @stockton.edu e-mails!
