Printing Support
Printing Support
Printers are available in the computer labs and gallery computers for Stockton students to use. Students can also print on campus to selected printers from their own laptops or mobile devices through https://papercut.stockton.edu/user.
🧭 Overview
- Learn how printing credits work, how to release print jobs, how to print from a lab computer, your own laptop, or a mobile device, and where to find printing stations on campus.
- Best for: Students, and faculty with ad hoc classroom printing needs.
- Time: ~10 minutes.
Prerequisites
- Active Stockton account and GoPortal credentials.
- Available print credit on your account.
- For personal device printing, a connection to the Stockton-Secure-WiFi network while on campus.
Print Costs and Credits
Upon matriculation at Stockton, students are allotted a one-time $50.00 credit for printing. This credit can be applied to any type of print — black & white, color, and art. Faculty members receive a one-time allocation for ad hoc printing while in the classroom. Faculty members who need regular access to printers should consult with their division on how to obtain printer resources for their pedagogical needs.
Active students can purchase additional print credits using a debit or credit card by visiting https://papercut.stockton.edu/user. If a job printed improperly or was damaged, contact the Help Desk at 609-652-4309 to request assistance with recovering expended credits. Alternative methods for print credit purchases are available for students who do not have a debit or credit card.
️ No refunds are given for printer credit purchases.* See the refund policy at the bottom of this page for details.
Color printing is available in F210, the Library, and the AC Residential Lab. The Library Learning Commons Room and Campus Center 2nd Floor Kiosk Printers use a Print Release Station located next to the printers. When a document is printed in those locations, you must go to the Print Release Station to complete your print job. The Print Release Station reduces waste from abandoned printouts and increases privacy for students printing sensitive material.
Per-page Print Rates
| Print Type | Rate |
|---|---|
| Black & White | $0.016 per page |
| Color | $0.10 per page |
| Art | $1.00 per tabloid or $1.33 per square foot |
Steps
Select a topic below for instructions on releasing print jobs, printing from your own device, finding a printer location, or using Art Lab printers.
Release a print job at a Print Release Station
- After clicking Print, go to the Print Release Station, located next to the printers.
- Log in using your GoPortal credentials, or swipe your Student ID to access your prints to be released.
- Release your print job(s). They should print immediately.
Alternatively, you can release prints remotely through the PaperCut interface. Navigate to https://papercut.stockton.edu/user and click the Jobs Pending Release tab. From there, click the print button to release individual jobs for immediate printing.

For assistance, refer to the Library Reference Desk or the Help Desk located in D121 or at 609-652-4309.
Print from your own laptop or mobile device
This service is only available on campus while connected to the Stockton-Secure-WiFi network.
Students can use their printing funds to print to selected Stockton printers from their own laptops or mobile devices. Select a method below to get started.
Printing to a campus printer from your mobile device has never been easier! Visit our installer page (QR code below) and follow the short and simple setup instructions to add any printer directly to your device. Mobility Print is compatible with Windows, macOS, Android, and iOS.

🍎 iOS
-
Connect and download the profile

Ensure your iPhone or iPad is connected to the Stockton-Secure-WiFi network. Navigate to the provided link or the Mobility Print website and tap Download to get the profile.
-
Install the profile

Go to Settings > General > Profiles (or VPN & Device Management in newer iOS versions). Select the downloaded profile and tap Install. Enter your passcode if prompted, then confirm the installation.
-
Print a document

Open the document or app you wish to print from. Tap the Share button or navigate to the Print option. Select the Mobility Print printer from the list, adjust settings as needed, and tap Print.
🍎 macOS
-
Download the installer
Visit the provided link or the Mobility Print website and download the macOS installer for Mobility Print.
-
Install the software
Open the downloaded file and follow the on-screen prompts to install Mobility Print.
-
Enable the print service
Once installed, open System Preferences, navigate to Printers & Scanners, and ensure Mobility Print is added as a printer.
-
Connect to the network
Ensure your Mac is connected to the same network as the Mobility Print service.
-
Print a document
Open the document you want to print, go to File > Print or press
Command + P, and select the Mobility Print printer from the list. -
Authenticate and print
If prompted, enter your credentials to connect to the printer. Adjust print settings as needed and click Print to send your job to the printer.
🤖 Android
-
Install the app
After scanning the QR code, press Install or update, then tap Install to download the app.


-
Open the app
Once installed, tap Open to launch the Mobility Print app.

-
Enable notifications
Allow Mobility Print to send you notifications when prompted by tapping Allow.

-
Activate the print service
Ensure the Mobility Print Service is toggled to On so the app can run in the background.

-
Check settings
Go to your Android settings and open Printing under Connected Devices or System Settings. Make sure Mobility Print is turned On in the list of Print Services.

-
Start printing
Open the document or app you want to print from. Select the Print option from the app's menu (typically found under Share or Settings), then choose a printer from the list provided by Mobility Print.

🪟 Windows
-
Download the installer
Navigate to the Mobility Print page provided by the QR code above and click Download to get the installer.

-
Select language
When prompted, choose your preferred language (e.g., English) and click OK.

-
Accept the license agreement
Read the license agreement, select I accept the agreement, and click Next.

-
Select printers
Choose the printers you want to add to Windows from the list (e.g., specific room printers), then click Next.

-
Log in to your account
Enter your network credentials (username and password) and click Next to continue.

-
Print a document
Open the file you want to print, press
Ctrl + P, or select File > Print. Choose the desired printer (e.g., MC LIB Color Printer) from the dropdown list, adjust print settings, and click Print.
PaperCut Web Print is a convenient option for quickly printing from your personal device. However, it offers limited functionality because it does not allow you to adjust printer settings (such as duplexing) and does not provide a print preview. For a more complete and customizable printing experience, use Mobility Print instead.
-
Sign in to PaperCut
Go to https://papercut.stockton.edu/user and authenticate with your GoStockton username and password.
-
Submit a job
From Web Print, click Submit a Job.

-
Select a printer
Select a printer from the list of available printers. Alongside each printer name you can also see its location on campus. After selecting a printer, click Print Options and Account Selection.

-
Set copies and upload the file
Designate how many copies of the document you would like to print, then click Upload Documents. Upload a file to send to the printer. Supported file types are noted on this screen, including Microsoft Office documents, PDF files, and image files.

-
Complete the upload
When ready, click Upload and Complete to send the job to the printer.
Find a printing station location
Look for the sign below at every Printing Station. See the list below for all locations.

Use the Art Lab printers
The AS-203 and AS-234 Art Labs contain black and white, color, and large format printers. These printers are only for Art student use and will only accept print jobs from authorized accounts.
Art Print refunds are issued if a print job is damaged or of unacceptable quality. To receive an Art Print refund, return your printed document to the Help Desk in D121 and the print cost will be refunded to your account.
ℹ️ Digital Innovation Suite - Library Learning Commons
Printing to the Epson Plotter Printer
The MC LIB Commons Epson Plotter can only receive print jobs from the computers located directly outside of the Digital Innovation Suite. The print process has two parts: sending your file from PowerPoint, then releasing the print in PaperCut.
Before You Begin
- Download the file you would like to print to your computer.
- Open the file in PowerPoint. The Epson plotter will not work as intended if you print from a web browser such as Google Chrome.
- Have your Stockton email and password ready to log in to PaperCut.
- The Epson plotter is not listed in PaperCut. Select it from the PowerPoint Print menu instead, as shown below.
Settings at a Glance
Use these settings for a standard 24 x 36 in. poster:
|
Setting |
Value |
|
Printer |
MC LIB Commons Epson Plotter |
|
Print Preview |
Enabled |
|
Document Size |
ARCH D 24 |
|
Orientation |
Landscape |
|
Roll Paper Option (Advanced tab) |
Auto Rotate |
|
Expected cost (24 x 36 in.) |
About $8.00 |
Part 1: Send Your File from PowerPoint
- In PowerPoint, go to File > Print and select MC LIB Commons Epson Plotter.
Note: If you don’t see the printer listed, please call 609-652-4309.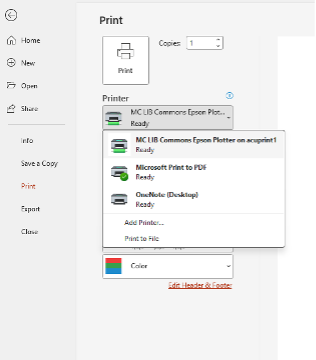
- Click Printer Properties.
- Near the bottom of the window, check Print Preview. This lets you review your print before it is sent to the printer.
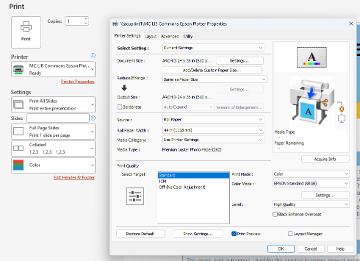
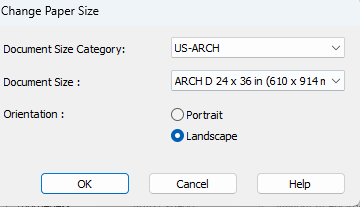
- Under Printer Settings, select the correct document size and orientation. For example, to print a 24 x 36
in. poster, select ARCH D 24 and Landscape.
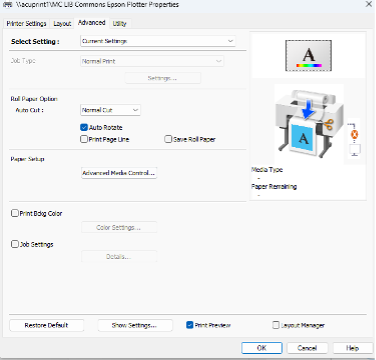
- Open the Advanced Under Roll Paper Option, select Auto Rotate.
- Click OK at the bottom of the window.
- Click Print.
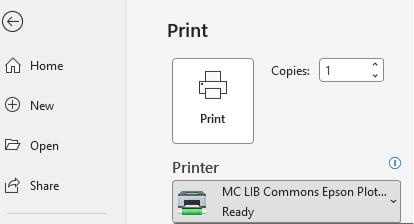
- The Print Preview window will appear. Make sure your preview looks similar to the image below.
Tip: If the orientation or size is incorrect, select Cancel, return to Printer Properties, and adjust your settings.
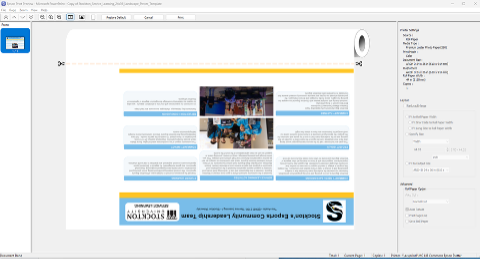
- If the preview looks good, select Print.
Part 2: Release Your Print in PaperCut
- Open a web browser and go to stockton.edu/user.
- Log in with your Stockton email and password.
- Select Jobs Pending Release.
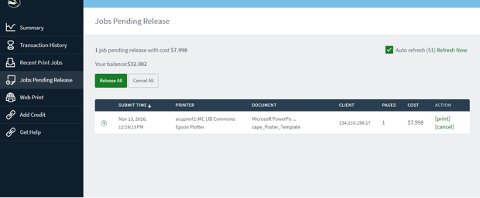
- Find your pending job. It may take a minute to appear after you click Print in PowerPoint.
- Check the cost before releasing the job.
Important: For a 24 x 36 in. print, the cost should be close to $8.00. If the cost is close to $1.00, your print will come out very small and is likely not set up correctly. Do not release it; review the settings in Part 1 and print again.
- Select Print.
The Epson plotter will print your file, cut it automatically, and drop it into the catch basket near the bottom of the printer.
Troubleshooting
|
Problem |
What to do |
|
The printer is not listed in PowerPoint |
Call 609-652-4309. |
|
The preview has the wrong orientation or size |
Select Cancel, return to Printer Properties, and confirm ARCH D 24, Landscape, and Auto Rotate. |
|
The cost is close to $1.00 instead of about $8.00 |
The print is likely too small. Do not release it; check your settings and print again. |
|
The job is not in Jobs Pending Release |
Wait a minute and refresh the page. Make sure you printed from PowerPoint, not a web browser. |
Need Help?
If you have questions or run into problems, please call 609-652-4309.
ℹ️ Additional Printing Information
- University printers by default print on both sides of each piece of paper.
- A document that prints on a single side of a piece of paper counts as 1 page.
- A document that prints on both sides of a piece of paper counts as 2 pages.
- Black and white documents that print to color printers still count against your color printing points quota.
- Blank pages printed will cost the same as a normal page from whichever type of printer is in use.
Get help
- Phone: 609-652-4309
- ️ Email: helpdesk@stockton.edu
- 🧾Submit a ticket
*Refund requests will be individually evaluated and reviewed. Refunds will generally be granted for prints that did not occur or did not print correctly due to a printer malfunction only within 30 days from the date that the attempt to print failed to process correctly. Print jobs sent to the wrong printer or with the wrong finishing options (size, color, etc.) will not be eligible for a refund. Prints from Arts and Science printers must first be delivered to the Help Desk in D121 for a refund to be issued. Please contact the Help Desk at 609-652-4309 with any questions.